Wednesday, 13 April 2011

WOYWW - 2nd One for Me!

Hi everyone,

Is it really Wednesday again??!! it must be as we're all posting our WOYWW links over at Julia's Stamping Ground.

So here is my desk today. You will see this week I have broken into those new Dovecraft Charcoal Prints papers that were waiting to be opened last week, I also decided to get the DCWV Black and White Prints pack too. My friend has asked if I'd like to do her a card for her Fiance' birthday next month, so considering I always find men's cards a little tricky I have started 2 to see how I get on! So we'll see, if they turn out well i will be posting them for you to see if they don't I won't :o) so see what crops up on here over the next few weeks to see if they turned out well or not!


You may notice the 2 cards propped up at the back haven't progressed much..... erm well.... not at all infact but they're just waiting for my inspiration to come back with those and they'll get finished. Acouple of people mentioned last week about the mirror at the back of my desk being a nice idea, well, i have a little confession to make there, my desk is in the corner of our spare bedroom and is supposed to be a dressing table for guests however I have kind of taken over it with one or two of crafting essentials ;o) but it's not like we have that many guests to stay over so it won't matter too much! so that explains the mirror. That's about all for this week.

Tuesday, 12 April 2011

Girly Pearly Card

Hi Everyone.

Back to pretty and girly after a doing few clean and simple cards posted below, I like to mix it up a bit!

I have made this card using a Sugar Naillie "Faith" Stamp which I coloured with Promarkers. Then layered up some Prima flowers and added a couple of swirl flourishes using individual flat backed pearls. The With Love sentiment is a lovely little stamp from Stamping All Day which I stamped using Versamark and embossed with a detail silver embossing powder, I surrounded the little heart sentiment with more flat backed pearls forming a trail down to the ribbon.


I would like to enter this card into the following challenges:
Totally Stampalicious - "Anything Goes"
Catch The Bug - "Four or More Layers"

Monday, 11 April 2011

Spring Colours

Hi everyone.

I decided to create a brighter version of my "More Manly" card (see below) to enter into The Crafty Pad's "Spring" challenge.

I used glitter card stock from the DCWV Citrus Stack for the main panel and trimmed using co-ordinating blue card also from the Citrus Stack and pealescent lime green textured card from a Jewel card pack which I punched using an X-Cut border punch to finish it off. The Happy Birthday sentiment was stamped using Brilliance Galaxy Gold and Lightning Black. I layered up a couple of Prima flowers and finished with a flat backed pearl for the embellishment.

Here's how it turned out


Saturday, 9 April 2011

A Bit More Manly.......

Hi all.

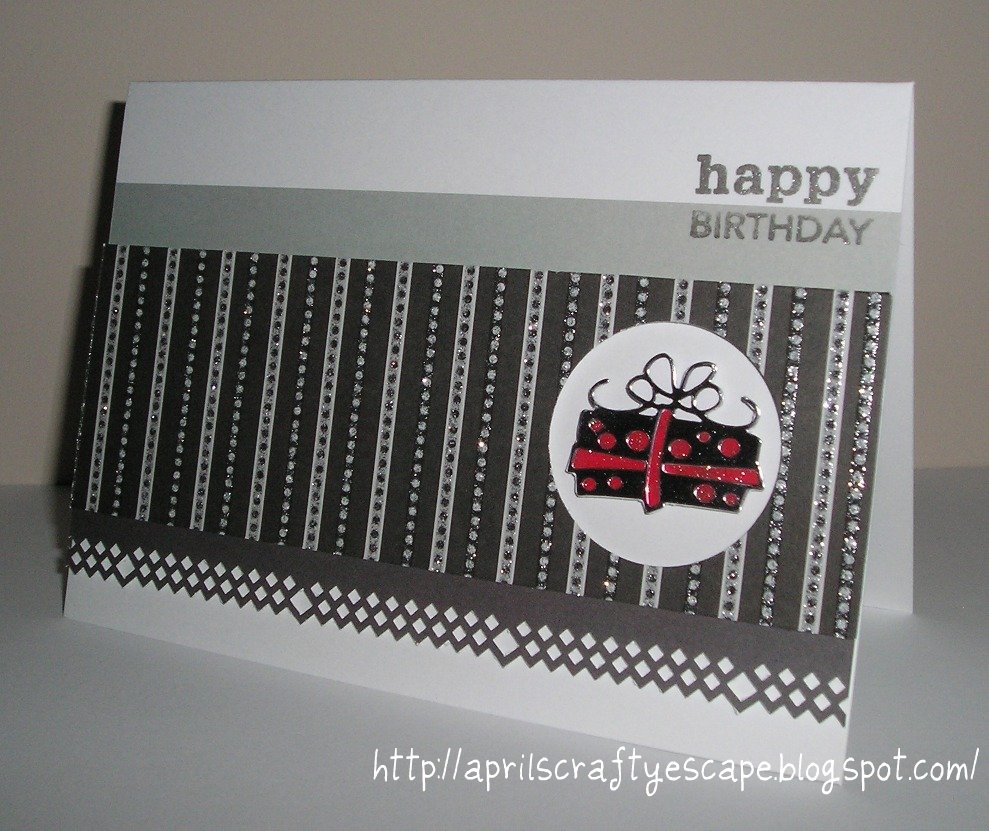
As i've said before I tend to struggle a bit with cards for Men, but I think this one has turned out quite well. The main panel of glittery card is from my much loved DCWV Glitter Mat Stack, I punched a 1 3/4" hole towards one end ready for the embellishment. I then cut a strip of grey paper and glued directly to the card I then stamped the sentiment using Brilliance Starlight Black ink so that the "happy" went on the card and "birthday" went on the grey paper. I then cut a strip of black paper which I punched one edge using an X-Cut border punch, I then attached that to the back of the main card panel. Using double sided foam I attached the glittery panel with the black trim to the card. For the embellishment I used a silver peeloff stuck onto some white card, I cut around that and coloured it in with a poppy Promarker and coloured over that using a Clear Sakura Stardust pen. I then attached that directly to the card using double sided foam.


I have entered this into One Stop Craft Challenge this week for their "Monochrome" theme

Thursday, 7 April 2011

50th Birthday Card

I was asked to make a 50th Birthday card by a friend of my Mum's, the basic requirements were, bright colours, 50th and Auntie. So this is what I came up with, I had originally planned to use 2 flowers in the design but i couldn't make up my mind how to work in the "50" so I decided to make a fan type flower and stamp the figure 50 using Brilliance Galaxy Gold onto a small disc to create the center. All the card stock is from the DCWV Citrus Stack, the scallop trim was cut from Dovecraft Designer Paper using an X-Cut border punch. I glitzed the flower up with a little Diamond Stickles and finished it off with a 5mm flat back pearl.


I will enter this in the Crazy Challenge this week as it fits with their "flowers" theme!

Wednesday, 6 April 2011

WOYWW Newbie

Hi everyone,

Since i've just set up my blog I thought I would take part in WOYWW I first learned of this weekly ritual when visiting Spyders Corner and really enjoyed reading about what she was up to. So here's some pics of my "cosy" crafty desk. It's actually in a reasonably tidy state at the moment! You'll see I'm currently working on a 90th Birthday card, this is for my boyfriends Grandma, I'll be posting detailed photos of this when it's finished, it's nearly there now!


Propped up at the back of my desk there are 2 Fathersday / Male cards that I have started but lost my way a bit so will have to get my thinking cap on with those! I always struggle with the "male" themed ones. You will also see my Martha Stewart Punch around the page "Double Loops" set, I decided to treat myself to this a couple of weeks ago, I love it! the punching around the verse for the card is the first time I have used it on a project and am so pleased I got it, think i'll be saving up for another of those sets!


On the floor you'll see my box of card and paper stock, the Dovecraft Charcoal prints that are on top are my most recent purchase, again I'm hoping they give me some inspiration for some male cards!


Think thats about it for now. Please have a browse through my earlier posts, I'd love to hear any comments about my cards, more followers are always welcome too ;) I will be updating regularly! remember if you would like to take part in WOYWW hop over to Julia's Stamping Ground


Tuesday, 5 April 2011

Cute Thank You Card

For this super cute thank you card I used a lovely digi stamp from Stamp Fairy coloured with Promarkers. Then layered him up on some plain card which I have embossed using a Crafts Too "Spots" Embossing Folder. To cut circles I use a Martha Stewart Circle Cutter, I find this a really useful tool, however a tip from me is to use low tack tape just to fix the card that you are cutting down as I find sometimes the card can slip and you get a "wonky" circle! oh, and don't press too hard with your cutting tool as it will dig into your mat and keep getting stuck, took me a while to get used to it but once I did I loved it! I finished the card off with some further embossed card which I cut a scalloped edge using an X-Cut Scallop Border Punch and some Prima flowers, I then added the thank you sentiment using a small Peel Off. I really love this digi stamp, he's soooo cute!


I think I will enter this into The Crazy Challenge as it goes with their "flowers" theme. Over at Top Tip Tuesday their theme is "Thank You" And also at Papertake Weekly as over there it's "Anything Goes"!

Sunday, 3 April 2011

Mother's Day Card No's 3 & 4

Happy Mother's Day to all Mum's out there!

To finish off the Mother's Day theme for this year here are the two cards I have made for my Mum.

This one is my first attempt at an easel card, decades behind everyone else I know, but finally got round to giving one a go. The background paper is from Dovecraft's Back to Basics selection, the glittery daisy design card stock is from the DCWV Citrus Stack. I have used Mulberry paper flowers to frame the "Tilda with Big Ribbon" image and used Promarkers to colour her in. Both the Happy Mother's Day and With Love sentiment stamps are from Stamping All Day, and were stamped using Versamark and detail silver embossing powder. Almost everything has been given an extra bit of glitz using Diamond Stickles, and the little silver butterflies are from my jewelry findings stash. I have used the Marrianne Designs Creatables Swirl Circle Die for the flourish on the card front and used flat back pearls to create flourishes on the base to give it that extra special finish.

I am so pleased with how this card turned out, i know my Mum will love it! I am going to enter it into the following challenges:

The Cute & Girly for their "Cute & Girly" challenge
Allsorts Challenge for their "Blooming Blossoms" theme
Magnolia Downunder Challenges for their "Heavy Metal" challenge
The Crafty Pad for their "Flowers" challenge


This one is a colour variation to the one in my previous post..... just using some different colour options from the DCWV Citrus Stack.


Saturday, 2 April 2011

Mother's Day Card No2

Another Mother's Day card, this one I made for a friend to give to her Mum.

The the glittery flower and dotty card stock are from the DCWV Citrus Stack. I cut a large part circle from the corner of a piece of card then punched out several co-ordinating circles using a 1 3/4" circle punch, I attached those to the back of the part circle so I could trim them off to suit. I hadn't intended on using a flower on this card but it looked a little plain without so layered up some Prima's to finish it off, If I had used a more heavily patterned paper for the backing and perhaps a plainer paper for the part circle it wouldn't have needed the flower to finish it off, but I think it looks good. I used my Stamping all Day Happy Mother's Day stamp with Versamark and some detail silver embossing powder for the sentiment and a silver gel pen just to fininsh it off nicely. I'm really pleased with how this card turned out, think I will do another one in oranges and yellows, will post soon.


Friday, 1 April 2011

Mother's Day Card No1

I have made a few Mother's Day cards this year so I will post a handfull on here for you to see.

This one is for my boyfriends Mum. I have used some gorgeous cardstock from DCWV Glitter Stack, I am a huge DCWV fan! then used some coordinating papers from a Dovercraft Designer Papers pack for the trim and sentiment panel. then layered everything up using foam pads. Added a couple of layered up prima flowers and blinged up the edges with a bit of Diamond Stickles and finished off with some flat back pearls. I stamped the sentiment using a lovely stamp from Stamping all Day with Versamark and used detail white embossing powder, I really like this stamp, it is a lovely fine text and seems to give a perfect impression every time and when used with detail embossing powder or a quality ink it gives a great finish!